As I said, this year will be a combination of learning for me; bread, cheese, and sausage will become some of the items that I will add to my abilities to become more sustainable. With the price of food on the rise I try to avoid the grocery store as much as humanly possible. Besides making a dent in our budget it’s depressing to see the cost of items that five years ago were half the price. It’s also the case where I live that the “college crowd” while school is in session shops my grocery store and make my experience less than palatable. I digress..
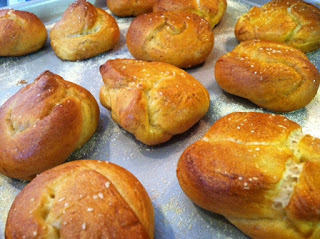
This afternoon while making my hubby comfortable after his shoulder surgery I decided to make a recipe that was recently posted on my FB page by my friend Maria for a Pretzel Challah. I liked the look of the little buns that were an alternative to the large loaf and I thought they would also be fun to have for my homemade mustards. The recipe has a few steps but actually kitchen time is very little. Most of the time is waiting for the rise, more rise, and rise again. It was a great project and will make them again since I am sure they will be gone once Jake, my son gets a taste. Please don’t be intimidated by how long the instructions are for this recipe. It is intended to give the step by step instructions so that it’s foolproof. Once you have mastered this recipe you have learned the basics of making water bagels too!
Adapted from The Skisa in the Kitchen blog
Mini Braided Pretzel Challah
Ingredients
Dough ingredients:
- 3/4 cup warm water
- 2 1/4 tsp active dry yeast (one packet)
- 1 tbsp white sugar
- 1 tbsp vegetable oil
- 1 1/4 tsp salt
- 1 pc. egg
- 2 to 3 cups flour
Water bath before cooking:
- 4 quarts water
- 1/2 cup baking soda
- 1/2 cup dark brown sugar
For baking in oven:
- Corn meal for dusting the baking sheet
- Kosher or coarse salt for dusting
EGG WASH INGREDIENTS
- 1 pc. yolk
- 1 tbsp cold water
- 1/4 tsp white sugar
- 1/4 tsp salt
YOU WILL ALSO NEED
- Mixing bowl, a smooth kitchen or tea towels, saucepan, large cookie sheet, large spatula, slotted spoon, whisk, oval pot with wide opening on top, parchment paper, pastry brush
Instructions
- Add warm (not hot) water, 1 tbsp white sugar, and yeast into a large bowl, whisk till combined.
- Let mixture rest for 10 minutes. Wait 10 minutes. The yeast should have activated, meaning it will look expanded and foamy. If it doesn’t, your yeast may have expired, which means your bread won’t rise—go buy some fresh yeast!
- Whisk in veggie oil, salt, and egg and beat till well combined.
- Begin adding the flour to the bowl by half-cupfuls, stirring with a large spoon each time flour is added.
- When mixture becomes too thick to stir, use your hands to knead. Continue to add flour and knead the dough until it’s smooth, elastic, and not sticky. The amount of flour you will need to achieve this texture varies—only add flour until the dough feels pliable and “right.”
- Place a saucepan full of water on the stove to boil. (this is for moisture in the oven to help the dough rise)
- Meanwhile, remove the dough from your mixing bowl and wash out the bowl. Grease the bowl with vegetable oil. Push the dough back into the bottom of the bowl, then flip it over so that both sides are slightly moistened by the oil.
- Cover the bowl with a clean, damp kitchen towel.
- Place the bowl of dough on the middle rack of your oven. Take the saucepan full of boiling water and place it below the rack where your dough sits.
- Close the oven, but do not turn it on. The pan of hot water will create a warm, moist environment for your dough to rise. If it’s a cold day, you can also heat the oven for 2-3 minutes till it’s warm inside (not hot). Let the dough rise for 1 hour.
First Rise Complete – Phase Two!
- Take the dough bowl out and punch it down using your fist several times to remove air pockets.
- Place it back inside the oven and let it rise for 1 hour longer.
Second Rise Complete – Phase Three!
- Take the dough out of the oven.
- Flour a smooth surface like a cutting board. Punch the dough down into the bowl a few times, then turn the dough out onto the floured surface. Knead for a few minutes, adding flour as needed to keep the dough from feeling sticky.
- Now it's time to braid your buns. For the full Challah loaf braiding instructions , click here.
- To make the mini Pretzel Challah rolls cut the dough into pieces so that you can roll out each tube or “snake” approximately 9 inches long. Wrap the tube into a knot and then connect the ends of the dough to form the rolls.
- Line a large cookie sheet with a clean, dry, smooth kitchen towel. Place the mini braids on top of the towel and let them rise for 30-45 minutes longer. You’ll know the dough is ready to bake when you press your finger into the dough and the indentation stays, rather than bouncing back.
Third Rise Complete – Phase Four!
- 18. Preheat oven to 350 degrees F. Bring 4 quarts of water to boil in a oval saucepan or roasting pan on your stovetop. The pan should be large enough to immerse the rolls in batches. Dissolve the baking soda and 1/2 cup brown sugar into the boiling water, using a whisk to break up the baking soda and sugar that settles on the bottom of the pan. Careful, the baking soda will fizz up when you add it to the boiling water!
- Bring the cookie sheet to the stove area. Gently immerse the mini braids in the boiling water for 30 seconds. Turn them once with a spatula to make sure both sides of the braid are evenly moistened by the boiling water. Use the slotted spoon to carefully remove the braids from the water and place them on the kitchen towel lined cookie sheet. Water Bath Done – Final Phase!
- Let the soaked braids rest on the kitchen towel for a few minutes while you prepare your egg wash. They will look slightly "water-logged" and pruny at this point, but don't worry, they'll puff up again when they bake. The kitchen towel will soak up any excess liquid so the bottom of each mini challah doesn't become soggy.
- To prepare the egg wash, whisk together the yolk, water, sugar and salt till smooth.
- Gently remove the mini challahs from the baking sheet by slowly pulling the kitchen towel off of the cookie sheet. Lay down parchment and sprinkle with a light dusting of cornmeal. Pretzel bread is sticky business; doubling up with parchment paper and cornmeal is the safest bet to ensure that the mini challahs don't stick.
- Place the mini braided challahs onto the parchment paper lined baking sheet(s).
- Brush the challahs evenly with a light, thorough coating of the egg wash.
- Dust the challahs with kosher or coarse salt to taste. Careful, they can get very salty very fast! A thin, even sprinkling will work best.
- The challah needs to bake for about 15-18 minutes total.
- Mini Pretzel Challah is finished when it's a dark golden brown color all over. Test the mini bread for doneness by turning it over and tapping on the bottom of the loaf—if it makes a hollow sound, it’s done.
- To keep the outer part of the pretzel challah soft and supple, you can brush each challah with a tablespoon of melted butter or margarine as soon as it comes out of the oven (if you use butter, it becomes a dairy dish, not pareve). This step is optional.
- Let challah cool slightly on the baking sheet or a wire cooling rack before serving. Pretzel challah is best served warm; reheat before serving. Store it wrapped tightly in plastic wrap or foil to keep it fresh.