


One of my favorite family meals is Sausage and Peppers. My hubby and I make homemade link sausage, grilled on the barbecue with a pile of sauteed onions, red & green bell peppers, topped with my homemade mustard, is just heaven. Ashley, one of my Facebook followers, asked me about pressure canning this combination to have in her pantry.
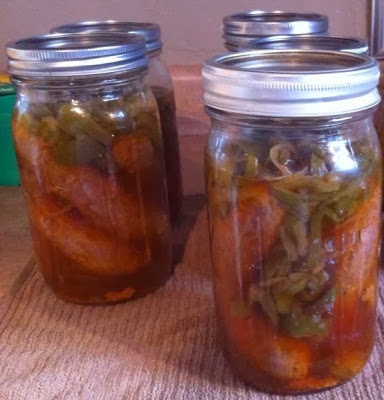
The important thing to remember is that sausage, which is essentially ground pork, must be precooked to remove as much fat as you can. In this recipe Ashley used the peppers from her garden, along with onions, and sauteed them before adding them to each jar. The saute brings out the sweeter flavor in the onions and peppers. Thanks again Ashley for your contribution to this recipe and the great picture! Enjoy!
Sausage and Peppers
Ingredients
- 20 pc. Italian Sausage links (homemade are the best, sweet or hot)
- 3 pc. large peppers, red or green
- 2 pc. large yellow onions
- 4 qt vegetable or beef stock
Instructions
Preparation:
- Slice the peppers into strips and thinly slice the onions. Prepare pints or quart jars, lids and rings by sterilizing. This recipe yields 5 quarts, 4 sausage in each. If you are doing pints you will need 10 pints and 2 cut in half sausages for each jar.
Cooking:
- In a frying pan saute the peppers and onions with the smallest amount of olive oil on medium heat. Cook for 10 minutes just to lightly brown the vegetables. Remove and set aside.
- In the same pan you will cook the sausage till cooked through. Place the sausage on a papertowel to drain the fat. In a large pot heat the stock to a simmer on medium heat.
Filling the jars:
- On a dishtowel place your hot jars and using your funnel in each jar fill with a portion of the peppers and onion so they are equally dispersed. Add to each jar the sausage.
- Then add the stock filling the jars to 1” headspace. Remove air bubbles and refill to the proper headspace if necessary.
- Taking a clean papertowel wet it with vinegar and wipe the rims of the jars removing any food particles that would interfere with a good seal.
- Using your magic wand extract the lids from the hot water and place them on the now cleaned rims. Add your rings to the tops of each of the jars and turn to seal just "finger tight".
Processing:
- Make sure your rack is on the bottom of the canner and place the jars in the pressure canner. Lock the lid and turn up the heat bring the canner to a boil. Vent steam for 10 minutes, then close the vent by adding the weighted gauge or pressure regulator (for dial gauge canner).
- Process for 90 minutes at 10 lbs of pressure (11 lbs for dial gauge canner). If you choose to do pints they should be processed for 75 minutes.
- (Adjust pressure for altitude) When complete turn off the heat and let pressure return to zero naturally. Wait two minutes longer and open vent.
- Remove canner lid. Wait 10 minutes then remove jars and place on dishtowel in a place that they will sit overnight to cool. Do not touch or move them till the next morning. Your food may still be boiling inside the jars. That is normal!
Sealing:
- Sometime in the next hour your jars will be making a "pinging" or "popping" noise. That is the glass cooling and the reaction of the lids being sucked into the jar for proper sealing. Some jars may take overnight to seal. Check your lids and reprocess any jars that did not seal. Remove rings for storage.
Labeling:
- Make sure to label your jars after they have cooled with the name of the recipe and the date canned. If you want to use the shrink labels in the picture you can order them Here!


One Comment
Cortnie
Posted on: October 27, 2019What is the best way to reheat these?