


Many of you have gone to the grocery store in search of mushrooms for your favorite or newly found recipe that you have to make. You arrive at the store to find that mushrooms were no where to be found or didn’t look to good. Since you are desperate to make the recipe that night, with hesitation, revert to getting them in the canned vegetable isle. You purchase this 6 oz can for more money than you can imagine and in preparing your recipe you read, “add mushrooms to skillet”. You open the can and realize that this version of a mushroom might be the worst looking canned mushroom and as a result wished that you stuck with the “no so good looking” fresh ones.
No more will you have to feel the pains of adding mushrooms that are not “worthy” of a recipe that you have poured into your love and hard work. The recipe for success is in the canning of fresh mushrooms. When they are inexpensive or on sale because of a glut produced by the farm you can put up half pint and pint jars so they are at the ready for any recipe. It’s what we strive for as canners. To read a recipe and say to ourselves,”I have that ingredient in my pantry” and not have to rush to the store in search of a “poor” or sometimes processed substitution.
Mushrooms for canners can be processed in two ways. The first is in a pressure canner as whole or sliced and with water and salt if desired. You are doing the same thing that is in that store bought 6oz can, but without preservative that you can’t pronounce. The second way is marinated but we will save that for the next post.
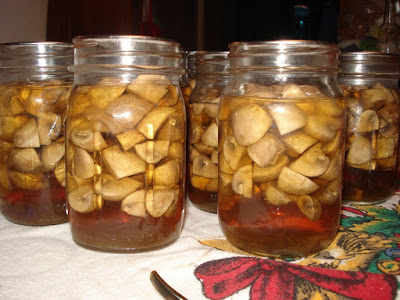
One of Jane’s concerns was the issue of floating. Because the mushrooms have a lot of air in them even the blanching and the processing in the pressure canner will not help the floating. In time some will sink down but as long as the jars are sealed and she stores them in a dark cool place they will be fine and she will have a quality mushroom that she can use for the next year. Thanks again Jane for your hard work and fantastic picture!
Mushrooms – Whole or Sliced
Ingredients
- 14-1/2 pounds is needed per canner load of 9 pints
- 7-1/2 pounds is needed per canner load of 9 half-pints
- 2 pounds per pint.
Instructions
- Quality: Select only brightly colored, small to medium-size domestic mushrooms with shortstems, tight veils (unopened caps), and no discoloration. Caution: Do not can wild mushrooms.
Preparation:
- Fill your pressure canner with 2 to 3 inches of water and place the rack at the bottom. Please follow the instructions that came with your canner for adding the amount of water. Begin heating the water in the bottom of the canner with the lid off.
Food Preparation:
- Select only brightly colored, small to medium-size domestic mushrooms with shortstems, tight veils (unopened caps), and no discoloration.
- Caution: Do not can wild mushrooms. Trim stems and discolored parts. Soak in cold water for 10 minutes to remove dirt. Wash in clean water. Leave small mushrooms whole; cut large ones.
Cooking:
- Cover with water in a saucepan and boil 5 minutes.
Filling the jars:
- On a dishtowel place your hot jars and fill using a slotted spoon and your canning funnel. Fill all the jars leaving 1” headspace. Add 1/2 teaspoon of salt per pint to the jar, if desired. For better color, add 1/8 teaspoon of ascorbic acid powder, or a 500-milligram tablet of vitamin C.
- Add fresh hot water, leaving 1- inch headspace. Remove air bubbles with your rubber spatula or chopsticks and refill if necessary.
- Taking a clean damp papertowel, wipe the rims of the jars removing any food particles that would interfere with a good seal for your lids.
- Using your magic wand extract the lids from the hot water and place them on the now cleaned rims. Add your rings to the tops of each of the jars and turn to seal just "finger tight".
Processing:
- Make sure your canning water has come to a simmer and place the jars in the pressure canner. Lock the lid and turn up the heat bring the canner to a boil.
- Vent steam for 10 minutes and then close the vent by adding the weighted gauge or pressure regulator (for dial gauge canner). Process pints or half pints for 45 minutes at 10 lbs of pressure (11 lbs for dial gauge canner).
- When complete turn off the heat and let pressure return to zero naturally. If you have a lid lock you will want to wait till the lock drops. Wait two minutes longer and remove the weighted gauge or pressure regulator.
- Remove canner lid. Wait 10 minutes then remove jars and place on dishtowel in a place that they will sit overnight to cool. Do not touch or move them till the next morning.
Sealing:
- Some time in the next hour your jars will be making a "pinging" or "popping" noise. That is the glass cooling and the reaction of the lids being sucked into the jar for proper sealing. Some recipes may take overnight to seal. Check your lids and reprocess any jars that did not seal. Remove rings for storage.


2 Comments
Katherine
Posted on: October 19, 2019I can still can’t large mushrooms if I cut them in quarters or halfes, correct?
Thanks
Becky
Posted on: October 19, 2019Hi…I am looking for Canning Mushrooms Part 2.